WordPress API Unauthorized – API calls to this blog have been disabled

This isn’t a long post and it’s really straight forward fix but I did not find anything else on the internet that directly answers this problem.  So I am hoping that this will help someone else out there as it’s a simple fix.

In my case I am:

  • Using Jetpack
  • Self-hosted site

I was receiving the error:

{“error”:”unauthorized”,”message”:”API calls to this blog have been disabled.”}

In order to fix it:

  • Disconnect the Jetpack plugin
  • Reconnect again.

Fixed the issue!

Default Visual Studio to Local IIS For Debugging

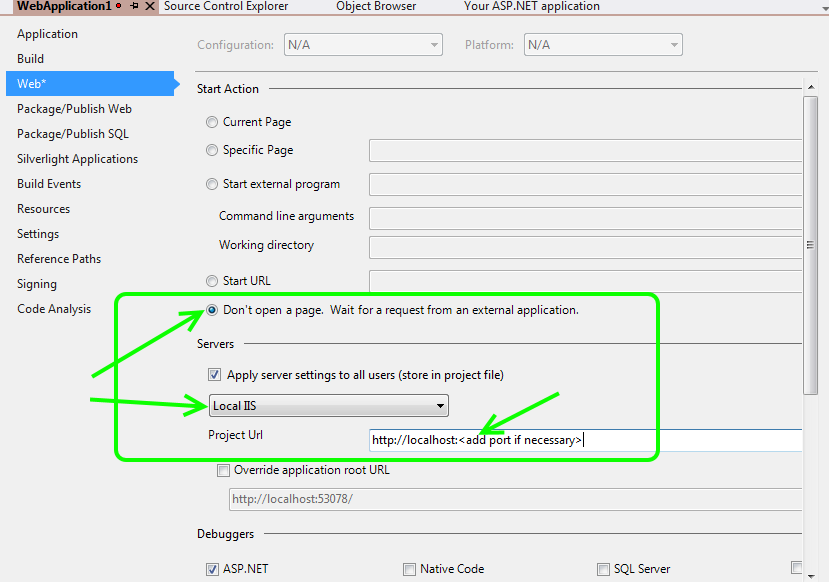
If you have a visual studio project setup in a way that you need to run from a local IIS rather then the IIS express that starts within Visual Studio then there are some quick ways to default your debugging to automatically point to the local.

  • On your project, right-click and go to “Properties”
  • Click on “Web”
  • (optional) Click on “Don’t open a page.”
  • Under servers, Select “Local IIS”
  • In the text box “Project Url”, make sure the correct url is entered for your website.
  • Save and you’re done.

Visual Studio Debug Local IIS

Using Genymotion with Ionic (Cordova, PhoneGap)

Just a quick tutorial here.  I have been using this great Ionic Framework for creating hybrid apps with AngularJS.

Genymotion is a piece of great software for Android developers. It has one of the fastest emulators out there, and now that I know about it, I can’t even imagine developing Android apps without using it. One of the things that make it stand out is that it uses Virtual Box under the hood.

Ionic has a command line for running the app on the emulator, iOS or Android. Just call ionic emulate android and it will fire up an emulator and install the app. Unfortunately, it couldn’t find the Genymotion emulator! Whhhhyyyyy?!

The issue is that it’s not Ionic or Cordova, the real thing that is called behind the scenes.  It’s because Genymotion doesn’t tell android-adb that it is an emulator. It tells that it is a device.  After realizing this – it makes sense.

We need to run as a “real device”. To do that we need to run:

ionic run android

Now it will find the Genymotion Virtual Android and everything will work.

Enjoy!

Ionic Framework / AngularJS Problem Using Infinite Scroll & Refresher

I started using the Ionic Framework for an app that I am creating.  It uses Angular.JS and allows one to really get a simple app up and running fairly quickly.  Part of the app that I am working on needs to use the ion-refresher and the ion-infinite-scroll.

Unfortunately, adding the two together hasn’t proven to work out so well.  It might be because of the beta version of Ionic or it is the originally intention.  Whatever the case may be, I hope this helps others if they come across what I was originally seeing.

Once I added the ion-refresher div and the ion-infinite-scroll div with obvious controller code – I was seeing the following:

Ionic Infinite Scroll Issue

You may need to zoom into the picture but essentially what was happening is the infinite scroll would appear right away as it saw that it was “at the bottom” and needed to load more records.  Really what we want is to have the main “loading data” shown and then the infinite scroll to check to scroll after all data has been loaded and ready.

To fix this – I added a ng-show=’tweets.length’. This just checked to see if the tweets had been loaded yet or not. If they load then show this piece and thus show the loading.

Here is my new current code:

1
2
3
4
5
6
7
8
9
10
11
12
13
14
15
16
17
18
19
    <ion-content>
        <ion-refresher on-refresh="refresh()"></ion-refresher>

        <div style="text-align: center" class="padding" ng-show="!tweets.length">
            <i class="icon ion-looping" style="font-size:25px"></i><br />Loading data
        </div>

        <ion-list>
            <ion-item class="item item-avatar" ng-repeat="tweet in tweets">
                <img ng-src="{{tweet.user.profile_image_url}}" />
                <h2>{{tweet.user.name}}</h2>
                <p>{{tweet.text}}</p>
            </ion-item>
        </ion-list>

        <ion-infinite-scroll ng-show="tweets.length"
                on-infinite="loadMore()"
                distance="5%">
        </ion-infinite-scroll>

Now my loading screen looks like the following:

IonicInfiniteScrollIssueResolved

Hope this helps someone else!

Error code: ERR_UNSAFE_PORT

This is because of Chrome restricting the local ports.

To fix the issue:

Right click on the chrome shortcut -> Properties -> Change the target:

"C:\Program Files (x86)\Google\Chrome\Application\chrome.exe" --explicitly-allowed-ports=81,84,87

Enable NHibernate Logging to see the SQL Statements Executed

We had a need to see the SQL statements that NHibernate was producing.

You can put something like this in your app.config/web.config file :

in the configSections node:

1
<section name="log4net" type="log4net.Config.Log4NetConfigurationSectionHandler,log4net"/>

In the configuration node:

1
2
3
4
5
6
7
8
9
10
11
12
13
<log4net>
  <appender name="NHibernateFileLog" type="log4net.Appender.FileAppender">
    <file value="logs/nhibernate.txt" />
    <appendToFile value="false" />
    <layout type="log4net.Layout.PatternLayout">
      <conversionPattern value="%d{HH:mm:ss.fff} [%t] %-5p %c - %m%n"  />
    </layout>
  </appender>
  <logger name="NHibernate.SQL" additivity="false">
    <level value="DEBUG"/>
    <appender-ref ref="NHibernateFileLog"/>
  </logger>
</log4net>

In the assembly.cs file add:

1
[assembly: log4net.Config.XmlConfigurator(Watch=true)]

Auto Response for Testing Node.js SaaS Based REST API

I have been enjoying the use of Node.js.  I started by first creating the backend which is a node.js server which has REST end-points that my client will call.  In this case the client is a mobile application to receive data on tweets.  That isn’t necessarily important for this short post.

I was at a coffee shop recently and really didn’t want to ping my node.js test server each time I was working on the client.  I used Fiddler to create an auto-response that would usually come back from the node.js server.

Fiddler Auto Response

1. In the picture you can see that I have right-clicked on the request to save the response.

2. Click on the AutoResponder tab.

3. Then insert your the response url you want to auto repsond to.  Add in the file location to the response you saved from the last step.

4. I clicked the check box above which allows other traffic to pass through so that I could still go to other websites.

Splitting Repository Subfolder / Subdirectory in GIT

I had a GIT repository that I wanted to structure differently.  I have also used this this same technique for splitting up their repositories into submodules.

The quickest approach, in my mind, was to first split out the history of a folder into a new branch:

  • git subtree split -P <name-of-folder> -b <name-of-new-branch-to-store-history>

After that go and create a new repository and pull in all the history from the folder:

  • git init
  • git pull </path/of/original repo> <name-of-new-branch-created-above>

Done with that repository.

Now back in your “original” repository you may want to clean out the history of that folder OR you may not.  In one case, I left the history alone and just deleted the folder.  In another I cleaned out the history because I thought it was redundant for that particular case.

To filter out a folder in the larger/original repository:

  • git filter-branch –subdirectory-filter <folder> — –all

Hope it helps!

Sencha Touch 2.2.1 Update from 2.0.x

Few things I encountered as I was updating to the latest version.  Hopefully this can help others:

Error: com.sencha.exceptions.ExProcess: compass process exited with non-zero code:1

  • Make *completely* sure you have ruby 1.9.3 installed and not 2.0.0.  If on windows use this installer.
  • Install compass from gem (ie. gem install compass).  Don’t install from node.js package manager.

Error: File not found or cannot be read: sass/stylesheets/fonts/pictos/pictos-web.woff

Error: Sass::SyntaxError on line [“190”] of C: Undefined variable: “$theme-name”.

  • If you re-used the “&.popular” selector you need to remove it now.

Stop Stolen Credit Card’s From Being Entered on Your Site (a.k.a Carding)

Carding as described by Wikipedia, Carding is a term used for a process to verify the validity of stolen card data. The thief presents the card information on a website that has real-time transaction processing. If the card is processed successfully, the thief knows that the card is still good. The specific item purchased is immaterial, and the thief does not need to purchase an actual product; a web site subscription or charitable donation would be sufficient. The purchase is usually for a small monetary amount, both to avoid using the card’s credit limit, and also to avoid attracting the card issuer’s attention. A website known to be susceptible to carding is known as a cardable website.

This happened to a site recently and I wanted to list out the counter-measures used to enforce better security against this type of credit card fraud.

  • Add stricter credit card checks.  These included, limiting countries that could use the form, flag transactions that looked suspicious, made sure address verification was turned on.  We were seeing proxy servers used in Pakistan and other countries.  It is an easy thing to setup and just helps detour these type of attacks.
  • Added ReCaptcha to our website.  Of course, this is just another tool in our tool belt but I was really hesitant on using it because, well, who likes these things, right?!  I guess for prevention of future programmable attacks, it is worth adding.  To note, it is important to activate SSL as there are ways to getting around this type of security.
  • Disallowed more then 3 transactions in a day from taking place.  This includes the recorded ip address OR the same name.  This covers situations like: 1) They used a card from different proxy servers but using the same name or possibly 2) used different name from the same proxy server.
  • Specified a minimum amount that someone could give through the form.  In this case it is a donation page.  So they could donate any amount.  Most carding is done with small amounts to just test the card.  Once a minimum amount was specified it is just another detractor from a thief using your page as a testing ground.
  • Add a blacklist of ip address.  Once you do know the proxy servers the thief’s are using you can create a blacklist as well.
  • Always record the IP address.

Some pretty simple and straight forward measures that someone can take if they are running into this issue.  This isn’t an exhaustive list but easy to add onto your site for a bit more security.