How to Change Windows 8.1 Network from Public to Private

Came across this recently and found many different avenues for fixing this problem.  Out of the one’s I found – the solution below worked the best for me as I especially liked that it didn’t involve tweaking the registry:

Set-NetConnectionProfile -InterfaceAlias “Wi-Fi” -NetworkCategory Private

  • Before running make sure the PowerShell is run as an administrator
  • “Wi-Fi” will be your network adapter you are trying to access to change.

If you need to get your connection information (Yours will probably be called something other than “Wi-Fi”):

  • Start a PowerShell as an Administrator
  • Run: Get-NetConnectionProfile

Default Visual Studio to Local IIS For Debugging

If you have a visual studio project setup in a way that you need to run from a local IIS rather then the IIS express that starts within Visual Studio then there are some quick ways to default your debugging to automatically point to the local.

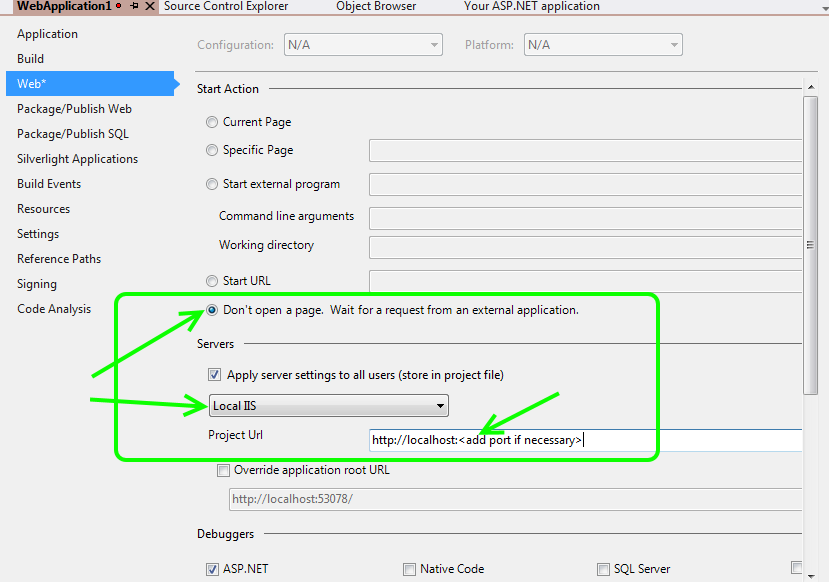
  • On your project, right-click and go to “Properties”
  • Click on “Web”
  • (optional) Click on “Don’t open a page.”
  • Under servers, Select “Local IIS”
  • In the text box “Project Url”, make sure the correct url is entered for your website.
  • Save and you’re done.

Visual Studio Debug Local IIS

Quickbooks Copy Over To Dropbox via Volume Shadow Copy Service

It’s a long title for a blog post that is very specific.

Here is the use case:

We want to backup our quickbooks file daily to Dropbox. The issue is that Quickbooks will lock the files while it is in use giving you sharing violations when trying to copy the files.

This means that in order to backup your quickbooks files you need to close down quickbooks and then run a backup. Annoying! Thankfully Windows XP and above have a service that is called Volume Shadowing. You can read all about it on the internet[s] :-D.

Previous *broken* solution

Just put all your Quickbook files straight into Dropbox… Bam! Your done, right!?  Well, it’s great if you only have one person accessing that Dropbox.  Let’s say you want someone across the country or, in our case, different countries accessing the files.  That person then has a share to the folder.

The problem comes if that other person either touches the files in anyway.  It could be through opening the files in Quickbooks, renaming, or anything.  If Dropbox sees a change it will do an upload of the files.

The problem is that at the original location, those files have been changing with new information.  Now the files end up getting overwritten and we have been finding that we can loose a days worth of information.

Eeeek! Bad news, right!  It’s nobody’s fault, it’s just that it’s hard to be careful not to change anything in Dropbox if you are on the side of the person that just wants to view the information not to write no data.

The final solution

  • Move Quickbook files out of the Dropbox folder.
  • Create a Windows task that runs daily.  The task will fire off a script (batch file).
  • The batch file mounts an additional drive that uses Volume Shadow Copy Service (also called Volume Snapshot Service or VSS)
  • The batch file copies the files through VSS that would have otherwise been inaccessible.
Details

There are many many ways to access the VSS and do this sort of thing.  I ended up coming across the following tools to help me out from this blog:

  • Volume Copy Simple Client – This just abstracts the built in volume shadow command line tool.
  • DosDev – Command line interface to the DefineDosDevice() and QueryDosDevice() API functions.  (In Windows 95/98/ME this utility is equivalent to the SUBST command.)
Now for the script…
I ended up with two scripts but I am sure you can put this together into one script:
QuickbooksCopyToDropbox.bat
This is called by the scheduler
1
2
3
@echo off

vscsc -exec=C:\\Scripts\QuickbooksCopyToDropboxRun.bat C:
QuickbooksCopyToDropboxRun.bat
1
2
3
4
5
6
7
8
9
10
11
12
rem DOS Volume Name to be assigned to the snapshot
set SNAPDOS=B:

rem The source folder and the destination folder
set DOCS_SRC=%SNAPDOS%\Users\\Documents\Quickbooks
set DOCS_DST=C:\Users\\Documents\Dropbox

dosdev %SNAPDOS% %1%\

xcopy %DOCS_SRC%\* %DOCS_DST%\* /Q /Y /R > %LOGFILE%

dosdev /D %SNAPDOS%
Done!

SharePoint Connect to DB

I am using the lite sharepoint version 2008 and the trickiest thing for me was figuring out how to connect to the database.  Figured out that Windows Sharepoint Services (WSS) 3.0 ship with SQL Server 2005 Embedded Edition. Now called the Windows Internal Database.

Steps for connecting to the internal SSEE database:

  • Open us Microsoft SQL Server Management Studio 2008
  • Server Name:   \\.\pipe\MSSQL$MICROSOFT##SSEE\sql\query
  • Use Windows Authentication


More information can be found here.

Microsoft SQL Server Express & WSS_Content

I had setup a SharePoint site about two years ago.  It been so easy to manage.  Every once in a while I will need to fix a thing or two.  That’s been about it, until now!  I should mention that managing this sharepoint server is not really part of my job and thus I end up putting very little time against managing it on a regular basis.  For my particular installation, I had WSS 3.0 and SSEE installed with all the defaults.

The only reason I looked at it this time was another web server on the box stopped working.  Come to find out, I was running out of hard drive space on that box.  Looking a little bit closer and became quickly aware that the issues was in the WSS_Content_log.  I am not as familiar with SQL server as I am Oracle, Postgres or MySQL.  The issue was obvious.  It wasn’t until doing some quick google searches that I came to realize that SQL was storing every transaction in this file so that you could go back to any point in time if there were db issues.

First things first, I need to connect to the db using SQL Server Management Studio.  It was strange because I could easily connect to <machine>\MICROSOFT##SSEE but the SharePoint database didn’t exist there.  I was so confused and eventually I talked to a SharePoint expert in our company. He gave me the following to log into the SharePoint database instance:

1
\\.\pipe\MSSQL$MICROSOFT##SSEE\SQL\query

Truncate and Shrink

Next thing I needed to do was update figure out how to truncate and shrink the WSS_Content_log file since it has become out of control.

  • Open Microsoft SQL Server Management Studio. Expand Databases. Right click on the WSS_Content database, go to PropertiesOptions, and change Recovery model: to Simple. Click OK.
  • This will truncate the log file. We must do this step first before we can shrink the file.

1
BACKUP LOG WSS_Content WITH TRUNCATE_ONLY

  • Confirm the name of the log file that you will be shrinking

1
SELECT * FROM sys.sysfiles

  • Shrink the log file

1
DBCC SHRINKFILE(WSS_Content_log, 1)
1
DBCC SHRINKFILE(&lt;NAME OF LOG FILE&gt;, 1)

That took my 16gig log file back down to a reasonable size.  Remember that doing this process will mean that you cannot revert your database to any point in time.  You either need to do backups on your own.  In my case, doing regular backups of the database is sufficient and that is what I have outlined above.


SharePoint Reset Password

Reset password
stsadm -o updatefarmcredentials -userlogin -password
stsadm -o updatefarmcredentials -identitytype NetworkService
iisreset /noforce
More Info:
http://technet.microsoft.com/en-us/library/cc288991.aspx
http://technet.microsoft.com/en-us/library/cc287638.aspx

Sharepoint Email Setup

When configuring the outgoing and incoming email
  • Install SMTP Server
  • Configure SMTP server by doing the following: http://technet.microsoft.com/en-us/library/cc772058(WS.10).aspx
Issues
Be careful because the exchange server you are trying to send the email from to your sharepoint instance may be blocking the emails from getting to sharepoint. If this is the case then you need to contact your sharepoint administrators to allow that email to be sent to your sharepoint instance.
You can verify this by sending an email from a client that sets the email server as your sharepoint instance and then send the email directly to that machine. If it works that way then you can try going through your organizations exchange server.

When configuring the outgoing and incoming email.

Install SMTP ServerConfigure SMTP server by doing the following: http://technet.microsoft.com/en-us/library/cc772058(WS.10).aspx

Be careful because the exchange server you are trying to send the email from to your sharepoint instance may be blocking the emails from getting to sharepoint. If this is the case then you need to contact your sharepoint administrators to allow that email to be sent to your sharepoint instance.You can verify this by sending an email from a client that sets the email server as your sharepoint instance and then send the email directly to that machine. If it works that way then you can try going through your organizations exchange server.

IE 9 Preview

Microsoft showed that they are back in the browser game with a preview of IE9 “platform” (platform seems to mean ‘haven’t got it together as a real browser yet, but we wanted to get it to you guys ASAP’).

Today, they updated the preview as they said they would (claiming they will do new releases every 8 weeks or so).

From the article: http://ajaxian.com/archives/new-ie9-preview-performance-hardware-acceleration-and-acid3?utm_source=feedburner&utm_medium=feed&utm_campaign=Feed:+ajaxian+(Ajaxian+Blog)&utm_content=Google+Reader