Quickbooks Copy Over To Dropbox via Volume Shadow Copy Service

It’s a long title for a blog post that is very specific.

Here is the use case:

We want to backup our quickbooks file daily to Dropbox. The issue is that Quickbooks will lock the files while it is in use giving you sharing violations when trying to copy the files.

This means that in order to backup your quickbooks files you need to close down quickbooks and then run a backup. Annoying! Thankfully Windows XP and above have a service that is called Volume Shadowing. You can read all about it on the internet[s] :-D.

Previous *broken* solution

Just put all your Quickbook files straight into Dropbox… Bam! Your done, right!?  Well, it’s great if you only have one person accessing that Dropbox.  Let’s say you want someone across the country or, in our case, different countries accessing the files.  That person then has a share to the folder.

The problem comes if that other person either touches the files in anyway.  It could be through opening the files in Quickbooks, renaming, or anything.  If Dropbox sees a change it will do an upload of the files.

The problem is that at the original location, those files have been changing with new information.  Now the files end up getting overwritten and we have been finding that we can loose a days worth of information.

Eeeek! Bad news, right!  It’s nobody’s fault, it’s just that it’s hard to be careful not to change anything in Dropbox if you are on the side of the person that just wants to view the information not to write no data.

The final solution

  • Move Quickbook files out of the Dropbox folder.
  • Create a Windows task that runs daily.  The task will fire off a script (batch file).
  • The batch file mounts an additional drive that uses Volume Shadow Copy Service (also called Volume Snapshot Service or VSS)
  • The batch file copies the files through VSS that would have otherwise been inaccessible.
Details

There are many many ways to access the VSS and do this sort of thing.  I ended up coming across the following tools to help me out from this blog:

  • Volume Copy Simple Client – This just abstracts the built in volume shadow command line tool.
  • DosDev – Command line interface to the DefineDosDevice() and QueryDosDevice() API functions.  (In Windows 95/98/ME this utility is equivalent to the SUBST command.)
Now for the script…
I ended up with two scripts but I am sure you can put this together into one script:
QuickbooksCopyToDropbox.bat
This is called by the scheduler
1
2
3
@echo off

vscsc -exec=C:\\Scripts\QuickbooksCopyToDropboxRun.bat C:
QuickbooksCopyToDropboxRun.bat
1
2
3
4
5
6
7
8
9
10
11
12
rem DOS Volume Name to be assigned to the snapshot
set SNAPDOS=B:

rem The source folder and the destination folder
set DOCS_SRC=%SNAPDOS%\Users\\Documents\Quickbooks
set DOCS_DST=C:\Users\\Documents\Dropbox

dosdev %SNAPDOS% %1%\

xcopy %DOCS_SRC%\* %DOCS_DST%\* /Q /Y /R > %LOGFILE%

dosdev /D %SNAPDOS%
Done!

Erply Inventory Registration – Automatically Scan Each Item

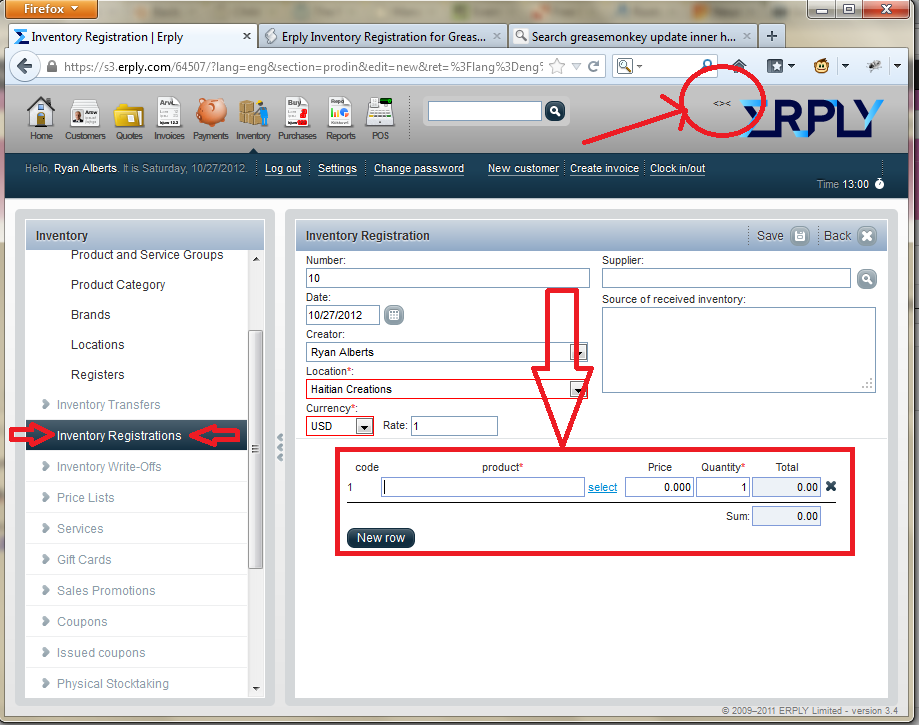
We wanted to just continue to scan each piece of inventory without having to interact with the computer from Erply.  On the Inventory Registration page, When you enter a barcode number a drop down box is displayed with one item. Erply, by default, will not select it automatically but waits for you to select.  Once the page refreshes (which I wish it didn’t), it puts the focus on the price box.  The way we want to work is just to continue scanning and come back later to fill in price.  This script is the solution for us in this use case.

Script Download: http://userscripts.org/scripts/show/151067

Script Description:

This helps in inventory registration for Erply. If you are scanning your items into Erply this script helps by automatically clicking on the one barcode dropdown that is selected and then once the page reloads it selects the next open text box ready for you to scan another barcode.  By default, Erply will wait for keyboard input for you once you scan an item.

Details

Below is a picture.  If the script is installed correctly then you will see a fish in the upper right corner of the screen.  This means that the script is installed and working on the inventory registration page.

Next thing to do is start scanning away!

You will notice one you start scanning that the drop-down will appear for a moment and then the script will select the only one listed.  The page will quickly refresh and then the script will select the bottom barcode/name box.

Let me know if you have questions!

Printing Labels from a Zebra LP2824 Printer in Erply

We are beginning to use Erply system for inventory. By the way, it is a fantastic system! Anyway… we were wanting to get the Zebra LP2824 Plus printer working here in Haiti.  Unfortunately, at this time of writing, there wasn’t an option to print a 2 1/4″ x 1/2″ label in Erply.  No problemo!

Erply recommends that you use Firefox (which is a great browser – I happen to switch between Google Chrome and Firefox).  So if you are using Firefox then you can head over and install Greasemonkey addon.

Then you can install the greasemonkey script for printing the barcode labels:

http://userscripts.org/scripts/show/138788

To use: You will need to pick “Barcode label (90mm x 14mm). The next page will automatically size the image and barcodes to fit the 2 1/4″ x 1/2”.

This script makes the label large enough so that the iPad Point of Sale application will be able to scan the barcode printed. Most barcode scanners will work but the label wasn’t large enough for the iPad to scan it.

Details:

– This script is made specifically for printing only EAN-8 labels. If you want to print EAN-13 you will need to adjust the script manually.

– Won’t work if you want to print the mass of the item on the label.

VirtualHost Forbidden on Windows 7 using XAMPP

Thought I would share a quick fix that was needed to have local subdomain when running XAMPP on Windows 7.

Go to C:\WINDOWS\system32\drivers\etc then locate ‘hosts’ file. NOTE: Create a backup of the file before editing.

Update it to include your virtual host:

127.0.0.1 localhost
127.0.0.1 dummy.localhost

Here is the reference I found:  http://www.codingcereal.com/2011/05/setting-up-multiple-subdomains-in-your-localhost-using-xampp/

Buying SSL Certificate from GoDaddy and Installing on Amazon EC2 Apache Instance

I ended up choosing GoDaddy.  I bought it for a year just in case things didn’t pan out as it was my first time buying and setting this type of thing up.

What I bought was a ssl certificate that will allow us to process credit card payments directly on our website. For example, when you buy something online your website will get a certificate that says, “I am really the merchant who I say I am and you can trust me”. If you don’t have a certificate that is from a trusted source then you web browser will pop-up a message saying, “this could be an intruder trying to steal your information”. Worse yet, if you don’t secure your site then credit card numbers are in plain sight for anybody to capture as the information travels through the internet.

It is pretty important to buy a certificate for the buyers protection and for the protection of the organization. The certificates ranges from $20/year to over $1000/year depending on where you buy them. The key is that you get them from a reliable, trusted source. Especially a source that you know will be around for a long time. Microsoft, Google and others will not trust just any company. You need a company that other companies trust. I went with GoDaddy because it is very cost effective but as a trusted company.

What did I do:

  • Bought a Turbo SSL Certificate from GoDaddy
  • Sign into the SSL Certificate Management
  • You will see a line amongst the clutter “SSL Certificate”  *New Certificate*  then the button “Launch”.
  • Add your CSR.  You will see “Enter your Certificate Signing Request (CSR) below”
  • To learn about generating the CSR you can go here

Generate the Certificate:

  • I made a new folder under /etc/ssl called /newcerts

/etc/ssl/newcerts$ sudo openssl req -new -newkey rsa:2048 -nodes -keyout heartlineministries.key -out heartlineministries.csr

  • Couple notes from GoDaddy help on answering the questions:

Common Name: The fully-qualified domain name, or URL, you’re securing.  If you add the name with www.domain.com then it will work for both www.domain.com and domain.com.

Organization: The legally-registered name for your business. If you are enrolling as an individual, enter the certificate requestor’s name.

 Verify Host

  • You will need to verify that you own the domain you are registering the certificate to. The easiest method, in my mind, is that you put the file on your server but you can either put a file on your server or add a TXT DNS record with a specific value.
  • After you are verified you will be able to download the certificate in a zip file.  GoDaddy has excellent instructions on how to install the certificate depending on what host you will be using.  For DreamHost, I downloaded the “cpanel/web managed” option.

Host Configuration

  • I have signed up for DreamHost. We are thankful for them! This is perfect because they all SSL whereas our previous place did not.
  • You will need to add the ability to have a static ip address.  In the case of DreamHost, this costed an extra $3.95/month.
  • In order to load your certificate you will need the private key, public certificate (crt) and optionally the certificate signing request (csr).
After this is all done, you are ready for HTTPS protocol!


Mobile Credit Card Processing

I signed up for two different mobile payment processing options.  I have ordered the Square (which is free) and have applied for the GoPayment (which has a two-month free trial).  The GoPayment will also send a free credit card scanner.  I figured we can just choose which one we like better 😉

Advantage / Disadvantage

Both Have
  • Mobile apps for ipad/iphone/android
Square
  • + More popular
  • + Possibly easier (not sure until we try 🙂
  • – Higher fee 2.75%
  • – No link with Quickbooks
GoPayment
  • + Links with Quickbooks (made by Intuit the same guys that make Quickbooks)
  • + Lower credit card fees 1.64% + 0.27 cents
  • –  Monthly fee 15.95

Natcom Haiti Phone Setup

The newest phone carrier in Haiti is Natcom.  It is a bit cheaper then the competitors.  I switched over because the internet had a pay-as-you-go service which I liked.  Natcom is also offering 3G and 4G.  I didn’t believe it at first but after running a speed test on it, I did in fact verify that it was truly doing 4G.

Natcom has four different plans for Haiti:

  • MI-1.  This is for paying 2.4 HG per Mb.
    • $0.06 per Mb.
  • MI-2.  You pay 80 HG for 50 Mb. $2 US
    • 1.6 HG per Mb or in USD $0.04 per Mb.
    • Charges you 2.4 HG per Mb after you use the 50 Mb.
  • MI-10.  You pay 400 HG for 600 Mb. $10 US
    • 0.8 HG per Mb or in USD $0.02 per Mb.
  • MI-U.  You pay 800 HG for unlimited.  $20 US
Now thinking through a scenario.  Let’s say you do use 500 Mb per month.  MI1 plan would cost you: $30.  Where as the MI-10 would cost you only $10.  Much better deal!


How do I sign up?

  • First you need to get a SIM and then activate it by calling another person.
  • Once you have activated your SIM then start adding on minutes.  You will need to add on the amount of which the plan requires in order for you to activate the internet on your phone.
  • Text the MI<number of plan> to 132.  So for MI-10 you would type “MI10”.
  • You will receive a text back to which you need to reply either YES to confirm or NO to cancel.
  • Once you type YES – you are all set to use 4G service in Haiti!

The way that the plan works is that it will renew with that same plan next month.  So whichever plan you pick it will keep it for the next month and charge you accordingly.

How do I change plans?

You can change plans at any time.  To cancel your plan you can type OFF to number 132. When you change plans it will pro-rate your plan based on how far into the month you are.

If you want to change plans – It is recommended that you text the code you want *before* the beginning of the next month.  Once the first of the month begins Natcom will automatically try to deduct the amount of your currently subscribed internet plan.

Trouble?

If you are having trouble getting the Natcom Haiti internet working it may be because you need to enter the Natcom APN.

Natcom APN: natcom
MCC: 372
MNC: 03

*You may or may not need to enter the MCC and MNC. Some phones seem to find it automatically.


* Updated March 1, 2013 – Added in How do I change Natcom Haiti plans and the “Trouble?” section

Amazon EC2 Server CPU 100%

I signed up for the free year using the Amazon EC2 micro instance.  I was pretty excited to move off of my home server.  As mentioned in previous posts.  Unfortunately as mentioned by other posts, it doesn’t take much to bring down your system.  I currently have hosted a few WordPress blogs on this server and as soon as it is crawled by Google, Bing, or others it immediately goes up to 100 percent cpu usage and then is stuck there until I can manually reboot it.

Here are a few attempts at fixing the problem which I have done so far in order to prevent these spikes:

  • Added WC Super Cache.  The goal is to take weight off the database hits by providing a HTML cached version of the page.  When the website gets crawled it will be able to serve the pages quickly and also not max out the CPU usage.
  • Signed up for CloudFlare.  This does caching as well and blocks potential threats to your website.
  • Tune Apache.  Here are set of recommended choices from someone:

StartServers 5
MinSpareServers 5
MaxSpareServers 10
MaxClients 20
MaxRequestsPerChild 5000

  •  I am sure the list will go on and on.  I might try monit but haven’t yet.
  • UPDATE:  Another link for this situation.

How to Make an iTunes Podcast

To a developer a podcast is just an mp3 or some other format.  That’s really about it.  In order to hook it up to iTunes you need to make sure it is served in the proper format and follows their guidelines.  It is not to difficult.

  • Record the audio. Audacity is free. An alternative would be Aviary.
  • Save the audio file (in MP3 format) to your computer desktop. Do not use special characters in the file name.
  • Add ID information (Artist, Album). Optionally give it album art.
  • Create an RSS feed. A standard RSS feed will do.  The easiest way to do it is to use a blog.  I picked Blogger.com and started a blog with the title of my podcast.  Hold off on posting just yet.
  • Go to feedburner. Type in the URL of your blog and click “I am a podcaster“. In the next screen, configure the elements for your podcast. These are the elements that directly relate to the podcast.  This is your official podcast feed.  Almost ready to submit to iTunes.
  • Upload your podcast.  This needs to be upload to a public location where you can have a link to your podcast.  I just added the podcast on my server under a /podcast directory.  You can find public domain websites as well.
  • Make your first post on your blog! The title of the post should be the title of that episode of the podcast.  The content will end up as the description.  Most importantly, at the end of the post, put a link to your mp3 file.
    • You may need to wait a bit for feedburner to update the feed.  Feedburner also has a page that you can use which will force it to update.  Useful in testing.
  • Submit to iTunes.  Now go to the iTunes store and click podcasts.  You will see on the right side of the page a link to submit podcast.  There you can enter your feedburner link and wait for approval from Apple!