Auto Response for Testing Node.js SaaS Based REST API

I have been enjoying the use of Node.js.  I started by first creating the backend which is a node.js server which has REST end-points that my client will call.  In this case the client is a mobile application to receive data on tweets.  That isn’t necessarily important for this short post.

I was at a coffee shop recently and really didn’t want to ping my node.js test server each time I was working on the client.  I used Fiddler to create an auto-response that would usually come back from the node.js server.

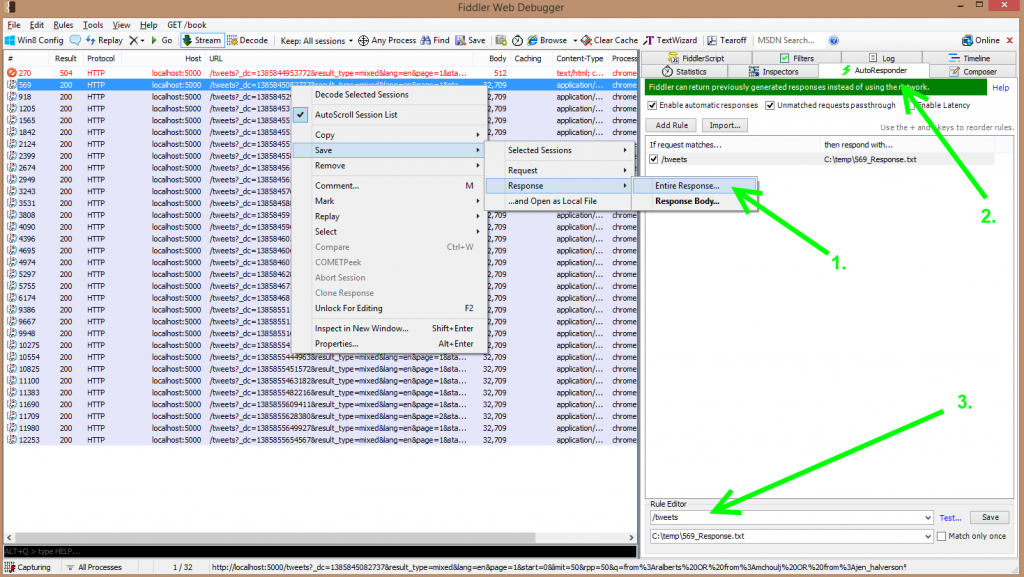
Fiddler Auto Response

1. In the picture you can see that I have right-clicked on the request to save the response.

2. Click on the AutoResponder tab.

3. Then insert your the response url you want to auto repsond to.  Add in the file location to the response you saved from the last step.

4. I clicked the check box above which allows other traffic to pass through so that I could still go to other websites.

Sencha Touch 2.2.1 Update from 2.0.x

Few things I encountered as I was updating to the latest version.  Hopefully this can help others:

Error: com.sencha.exceptions.ExProcess: compass process exited with non-zero code:1

  • Make *completely* sure you have ruby 1.9.3 installed and not 2.0.0.  If on windows use this installer.
  • Install compass from gem (ie. gem install compass).  Don’t install from node.js package manager.

Error: File not found or cannot be read: sass/stylesheets/fonts/pictos/pictos-web.woff

Error: Sass::SyntaxError on line [“190”] of C: Undefined variable: “$theme-name”.

  • If you re-used the “&.popular” selector you need to remove it now.

Stop Stolen Credit Card’s From Being Entered on Your Site (a.k.a Carding)

Carding as described by Wikipedia, Carding is a term used for a process to verify the validity of stolen card data. The thief presents the card information on a website that has real-time transaction processing. If the card is processed successfully, the thief knows that the card is still good. The specific item purchased is immaterial, and the thief does not need to purchase an actual product; a web site subscription or charitable donation would be sufficient. The purchase is usually for a small monetary amount, both to avoid using the card’s credit limit, and also to avoid attracting the card issuer’s attention. A website known to be susceptible to carding is known as a cardable website.

This happened to a site recently and I wanted to list out the counter-measures used to enforce better security against this type of credit card fraud.

  • Add stricter credit card checks.  These included, limiting countries that could use the form, flag transactions that looked suspicious, made sure address verification was turned on.  We were seeing proxy servers used in Pakistan and other countries.  It is an easy thing to setup and just helps detour these type of attacks.
  • Added ReCaptcha to our website.  Of course, this is just another tool in our tool belt but I was really hesitant on using it because, well, who likes these things, right?!  I guess for prevention of future programmable attacks, it is worth adding.  To note, it is important to activate SSL as there are ways to getting around this type of security.
  • Disallowed more then 3 transactions in a day from taking place.  This includes the recorded ip address OR the same name.  This covers situations like: 1) They used a card from different proxy servers but using the same name or possibly 2) used different name from the same proxy server.
  • Specified a minimum amount that someone could give through the form.  In this case it is a donation page.  So they could donate any amount.  Most carding is done with small amounts to just test the card.  Once a minimum amount was specified it is just another detractor from a thief using your page as a testing ground.
  • Add a blacklist of ip address.  Once you do know the proxy servers the thief’s are using you can create a blacklist as well.
  • Always record the IP address.

Some pretty simple and straight forward measures that someone can take if they are running into this issue.  This isn’t an exhaustive list but easy to add onto your site for a bit more security.

Erply Inventory Registration – Automatically Scan Each Item

We wanted to just continue to scan each piece of inventory without having to interact with the computer from Erply.  On the Inventory Registration page, When you enter a barcode number a drop down box is displayed with one item. Erply, by default, will not select it automatically but waits for you to select.  Once the page refreshes (which I wish it didn’t), it puts the focus on the price box.  The way we want to work is just to continue scanning and come back later to fill in price.  This script is the solution for us in this use case.

Script Download: http://userscripts.org/scripts/show/151067

Script Description:

This helps in inventory registration for Erply. If you are scanning your items into Erply this script helps by automatically clicking on the one barcode dropdown that is selected and then once the page reloads it selects the next open text box ready for you to scan another barcode.  By default, Erply will wait for keyboard input for you once you scan an item.

Details

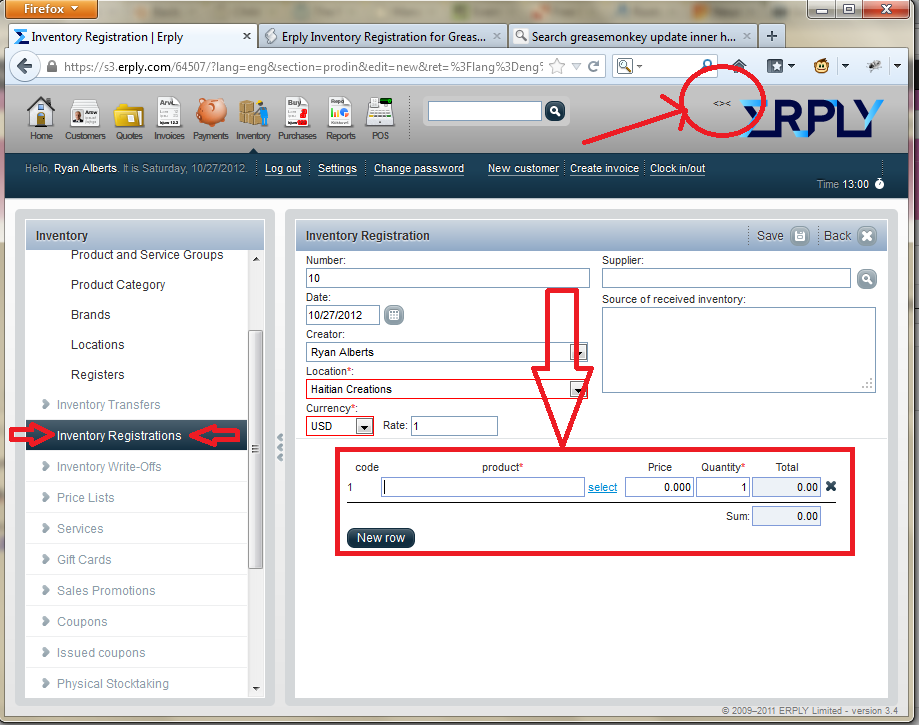
Below is a picture.  If the script is installed correctly then you will see a fish in the upper right corner of the screen.  This means that the script is installed and working on the inventory registration page.

Next thing to do is start scanning away!

You will notice one you start scanning that the drop-down will appear for a moment and then the script will select the only one listed.  The page will quickly refresh and then the script will select the bottom barcode/name box.

Let me know if you have questions!

Yii Framework Hide index.php from Url

Be sure to follow the guide: http://www.yiiframework.com/doc/guide/1.1/en/topics.url

One thing I was missing is that you need to make sure when modifying the rewrite rules that you have the following specified for either your virtual host or in the apache conf file:

AllowOverride All

Yours might look like:

<Directory “C:/Development/Workspace_Juno/ErplyWeb”>

AllowOverride All
Order Allow,Deny
Allow from all
Options +Indexes

</Directory>

Using Erply InventoryAPI

Erply has some awesome api’s available to access backend data.  I particularly was interested in loading a bunch of suppliers through a spreadsheet saved in CSV format. I would like a quick import button but this works great as well!

I made a quick script to load in the file. Done 😀

1
2
3
4
5
6
7
8
9
10
11
12
13
14
15
16
17
18
19
20
21
22
23
24
25
26
27
28
29
30
31
32
33
34
35
36
37
38
39
40
41
42
43
44
45
46
47
48
49
50
51
52
53
54
55
56
57
58
59
60
61
62
63
64
65
66
67
68
69
70
71
72
73
74
75
76
77
78
79
80
81
82
83
84
85
86
87
88
89
90
91
92
93
94
95
96
97
98
99
100
101
102
103
104
105
106
107
108
109
110
111
112
113
114
115
116
117
118
119
120
121
122
123
124
125
126
127
128
129
130
131
132
133
134
135
136
<?php
/**
 * Used for importing Suppliers into Erply from a CSV spreadsheet.
 *
 * The format should look something like this:
 *
 * Code | First & Last Name | GroupID number | Notes
 *
 * Example:
 * 100  Dieula Etienne  7 ED
 *
 */

ini_set('max_execution_time', 180);
 
session_start();

// include ERPLY API class
include('EAPI.class.php');

// Initialise class
$api = new EAPI();

// Configuration settings
$api->url = "https://s3.erply.com/api/";
$api->clientCode = "49102";
$api->username = "<insert username>";
$api->password = "<insert password>";


////////////////////////////////////
// Supplier Groups
////////////////////////////////////
function getSupplierGroups() {
  $supplierGroups = $api->sendRequest("getSupplierGroups", array());
  $supplierGroupsOutput = json_decode($supplierGroups, true);
 
  print "<pre>";
  print_r($supplierGroupsOutput);
  print "</pre>";
}


////////////////////////////////////
// Load CSV
////////////////////////////////////
function loadCSV() {
  $csv = array();
  $lines = file('suppliers.csv', FILE_IGNORE_NEW_LINES);
 
  foreach ($lines as $key => $value)
  {
      $csv[$key] = str_getcsv($value);
  }
   
  echo '<pre>';
  print_r($csv);
  echo '</pre>';
 
  return $csv;
}


////////////////////////////////////
// Get Suppliers
////////////////////////////////////

// Get client groups from API
// No input parameters are needed
$result = $api->sendRequest("getSuppliers", array("recordsOnPage" => 100));

// Default output format is JSON, so we'll decode it into a PHP array
$suppliers = json_decode($result, true);
//print_r($suppliers);

print "<pre>";
foreach (loadCSV() as $key => $row) {
  $newCode = $row[0];
  list($newFirst, $newLast) = explode(" ", $row[1]);
  $newGroupID = $row[2];
  $newNote = $row[3];
  print "$newFirst | $newLast | $newCode | $newGroupID | $newNote <br />";
 
  $isFound = FALSE;
  $supplierId;
 
  foreach ($suppliers["records"] as $key => $value) {
    //print "Value code: " . strcmp($value["code"],$newCode) . " | " . $value["code"] . " | " . $newCode . " | <br />";
   
    if(isset($value["code"]) && strcmp($value["code"],$newCode) == 0) {
      $isFound = TRUE;
      $supplierId = $value["supplierID"];
      print "Found Code: $newCode for $newFirst with supplier id of $supplierId <br />";
      break;
    }
  }

  $saveSupplier;
 
  if ($isFound) {
    //Update supplier  
    $saveSupplier = array(
      "supplierID" => $supplierId,
      "firstName" => $newFirst,
      "lastName" => $newLast,
      "groupID" => $newGroupID,
      "notes" => $newNote,
      "code" => $newCode
    );
    print "Supplier will be *updated* with code: $newCode for $newFirst <br />\n";

  } else {
    //New Supplier
    $saveSupplier = array(
      "firstName" => $newFirst,
      "lastName" => $newLast,
      "groupID" => $newGroupID,
      "notes" => $newNote,
      "code" => $newCode
    );
    print "New Supplier will be added with code: $newCode for $newFirst <br />\n";
       
  }
 
  $result = $api->sendRequest("saveSupplier", $saveSupplier);
  $suppliers = json_decode($result, true);
  print_r($suppliers);
  break;
}


print "</pre>";

?>

The script works great but I do have an issue with names that have special characters for example: “Marléne Dessalines”. The “é” get’s cut off. I haven’t spent anytime to see if it’s a problem with CurL or if it’s an issue with the server accepting it.

Posted in PHP

Printing Labels from a Zebra LP2824 Printer in Erply

We are beginning to use Erply system for inventory. By the way, it is a fantastic system! Anyway… we were wanting to get the Zebra LP2824 Plus printer working here in Haiti.  Unfortunately, at this time of writing, there wasn’t an option to print a 2 1/4″ x 1/2″ label in Erply.  No problemo!

Erply recommends that you use Firefox (which is a great browser – I happen to switch between Google Chrome and Firefox).  So if you are using Firefox then you can head over and install Greasemonkey addon.

Then you can install the greasemonkey script for printing the barcode labels:

http://userscripts.org/scripts/show/138788

To use: You will need to pick “Barcode label (90mm x 14mm). The next page will automatically size the image and barcodes to fit the 2 1/4″ x 1/2”.

This script makes the label large enough so that the iPad Point of Sale application will be able to scan the barcode printed. Most barcode scanners will work but the label wasn’t large enough for the iPad to scan it.

Details:

– This script is made specifically for printing only EAN-8 labels. If you want to print EAN-13 you will need to adjust the script manually.

– Won’t work if you want to print the mass of the item on the label.

Sencha Touch 2 Showing Old Data After Refresh on Production

I am not totally understanding why even after updating production and seeing the correct delta’s that I am seeing the old site information.

For now: I have figured out that you can clear the local storage in google chrome (very easy to do).

On my andriod device I needed to do the following in the browser url bar:

javascript:localStorage.clear();

This would then allow me to see the newest production site.

I am hoping this problem is because I have been messing around and deleting the production base. Guessing I will learn more once I get closer to actually putting it in production!

Sencha Touch Disable Default Caching on JS Files _dc

I didn’t find much documentation on it, though I probably just missed it somewhere 😀  If you are using Ext.Application for building up your Javascript files then you will want to know how to disable the nocache mechanism that is setup by default.  You will notice that the files have *.js?_dc=<insert timestamp number here>.  It’s simple to fix this problem.

1
2
3
4
Ext.Loader.setConfig({
enabled: true,
disableCaching:false
});

Just add the disableCaching to false and your good to go!